Most marketers use Google Tag Manager to add tags. Only a few expert professionals know how to use it to debug broken funnels, fire events with surgical precision, bypass platform limits, and track what others can’t.
This guide brings you 29 such advanced GTM tips, right from custom triggers to creative uses of variables. These ideas were first shared during my MozCon talk and are now expanded with the practical how-to details we couldn’t fit into the presentation.

This post also builds on the brilliant work of GTM experts like Simo Ahava, Cardinal Path, Parsnip, LunaMetrics, Chris Goddard at SERPs.com, and Mike Wiegand at Portent. Without their innovations and documentation, much of what’s in this post wouldn’t exist.
So, let’s get started.
Tip 1: Crawl for GTM
If you plan on using Google Tag Manager to do some really epic marketing, it’s more than worth taking the time to ensure that the base container code is actually present on every page of your site. It would be a shame if you rolled out some creative tagging only to realize after a few weeks that GTM was never on important pages or entire sections of your site.
Using Screaming Frog, we can use Custom Search Filters to check that GTM’s base code is present on every page.
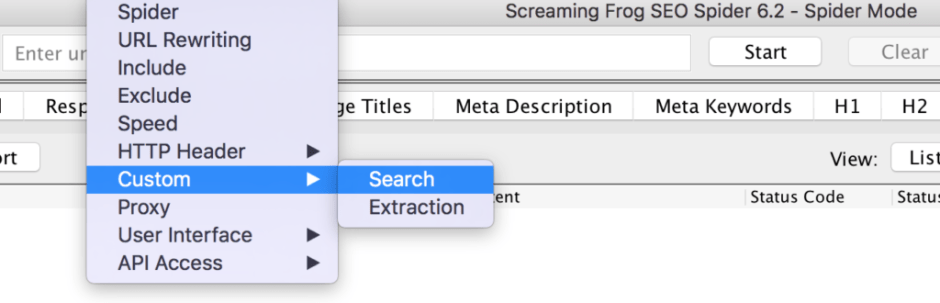
When you open up Screaming Frog, head to the “Configuration” menu and then choose “Custom” > “Search”. This will bring up a menu where you can configure a Custom Search Filter for your crawl. Grab your container’s GTM ID (e.g., GTM-1234567) and set up one custom search to find all the pages with GTM and another to find all of those without.

If you were so inclined, you could even use the Custom Extraction version of this functionality to deploy a RegEx that pulls out the GTM ID, or IDs, from each page. This is great if you’re coming into an account without historical knowledge and you need to know whether there are multiple different GTM containers present throughout the site.

Tip 2: Inject jQuery
Warning: This is pretty hacky, but it works.
Having jQuery available is important for some of the advanced stuff we’re going to want to do (especially Tip 3 immediately below). Now, it’s okay if you’re not familiar with what jQuery is. In fact, if you’re not, that makes it all the more important because jQuery is going to make life a whole lot easier for anyone without a development background.
In short, jQuery is a JavaScript library that’s designed to make selecting HTML elements and handling interaction events much easier. More than 70% of websites today use jQuery, so the chances of you actually needing to do this on a regular basis aren’t that great. But, you’ll definitely want an option like this if you’re ever in a situation where you can’t get jQuery added to your site in the standard way.
What we’re essentially going to do in Google Tag Manager is use an HTML Tag to run a good old-fashioned JavaScript function when each page loads. This function will:
- Check to see if jQuery has been loaded.
- If it hasn’t, go back into the source code and add it (If it has been loaded, great. Nothing else needs to happen).
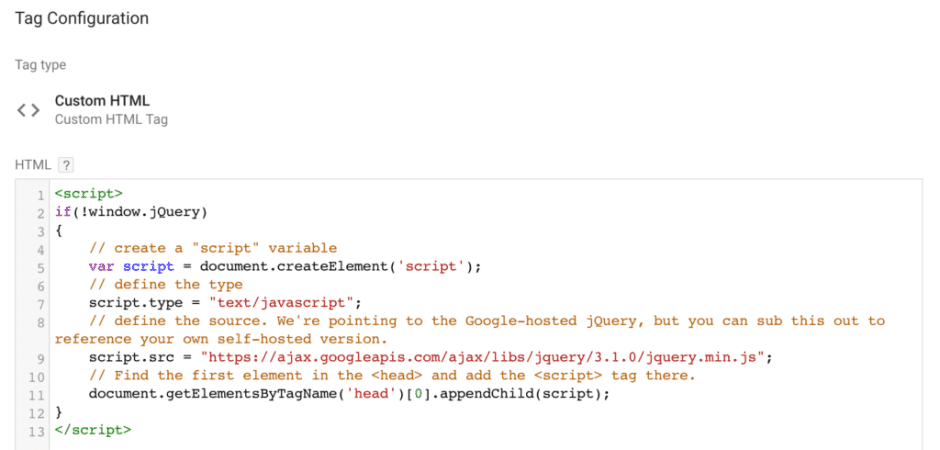
Now keep in mind that this isn’t the right, proper way to do it. Why? When jQuery is actually present in your source code, the library has a chance to load before anything else happens on the page. In contrast, the method that we’re talking about here will get you by in a pinch, but it could be take up to a full second for GTM to load, run the check, and then retroactively load the jQuery library. Bottom Line: Make sure to set this Google Tag Manager tag to run first, before you fire any other complex tagging and tracking.
Tip 3: Harvest Click Stream Data
So now let’s take a dip in the deep end: using Google Tag Manager to track every click interaction on your site without having to involve your development partner. Now in practice, you don’t want be tracking every single click that every user performs on your site. Obviously, not all clicks are created equal, so figure out which interaction events are important to you as a marketer and which ones are important to your company. Define what those are so you can track them.
There are dozens of ways to accomplish any goal with Google Tag Manager (and click tracking is no exception) but this approach focuses on elegance and efficiency. We’re going to handle tracking all the clicks you want with just two tags in GTM; an HTML tag (for handling all our click interactions) and a Google Analytics tag (to receive and send data on those interactions).
The first HTML tag in GTM is where jQuery is going to come in handy. Using that library, you can easily attach click handlers to each important element on your site. These click handlers are going to execute a JavaScript function that, when the element in question is clicked, will pass click data into your dataLayer (more on that later).
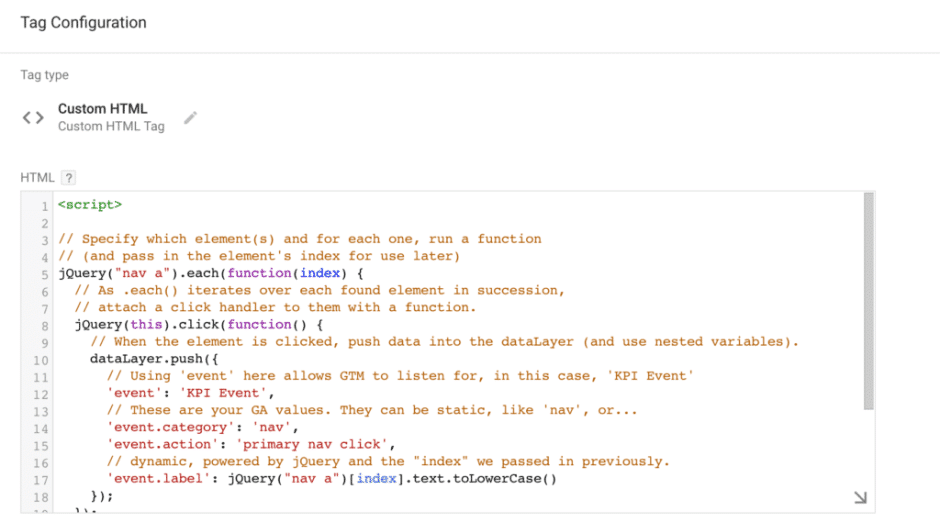
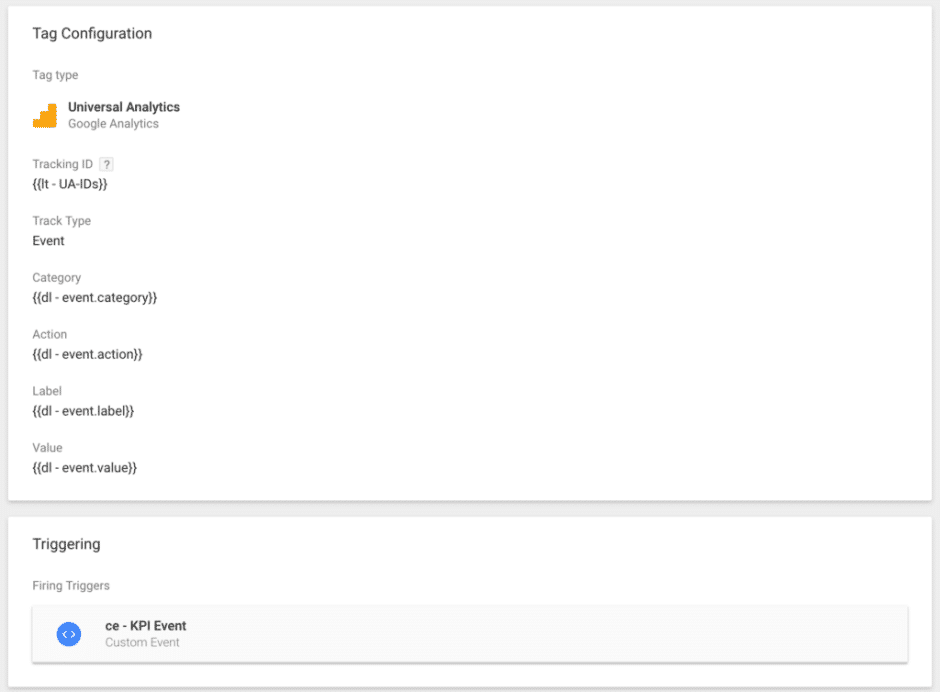
As that happens, your second GTM tag (a Universal Analytics GA event tag) is going to listen for information being pushed into the dataLayer, then receive or catch that data, and immediately send it right into Google Analytics as an event that you can then see in your reports.
Of course, the bulk of the work in getting this all configured is going to lie in determining which elements you want to track and then developing a clear naming system so that the data is easily readable and navigable in your Google Analytics reports.
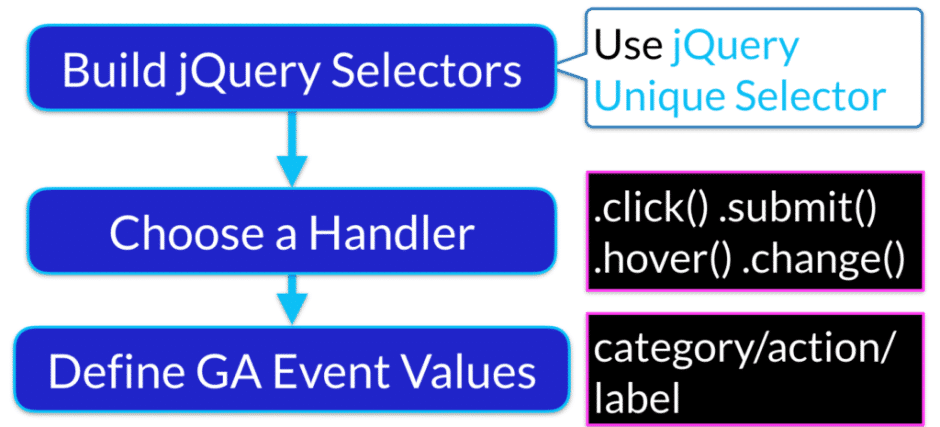
You’ll also spend a fair amount of time figuring out how to select each element of importance using jQuery so that you can attach a handler to it. Get the Chrome Extension jQuery Unique Selector to simplify that process. It will allow you to quickly identify the best way to home in on any given element so you can attach the click handler.
Tip 4: Test & Release
This is something that I adore about Google Tag Manager: the ability to test a tag configuration, fail, test something else, get it to kind of work, improve it until it’s perfect, then rinse and repeat, all on your own machine. It doesn’t matter if you have no idea what you’re doing; you can keep your work under wraps until you’re ready for prime time, and only then publish the final version that contains all of your completed tagging.
This works great if you already have Google Tag Manager on your site. You just fire it up in Preview mode and you’ll be able to see all your tagging in action in a dedicated debugging console.
What’s really cool though is that you can even do this if Google Tag Manager hasn’t been added to the site yet. Just install a Chrome Extension called Google Tag Manager Injector, drop in your container’s GTM ID, click Start and you’re ready to roll. Within your browser, it’ll be just like GTM is actually running on the live site.
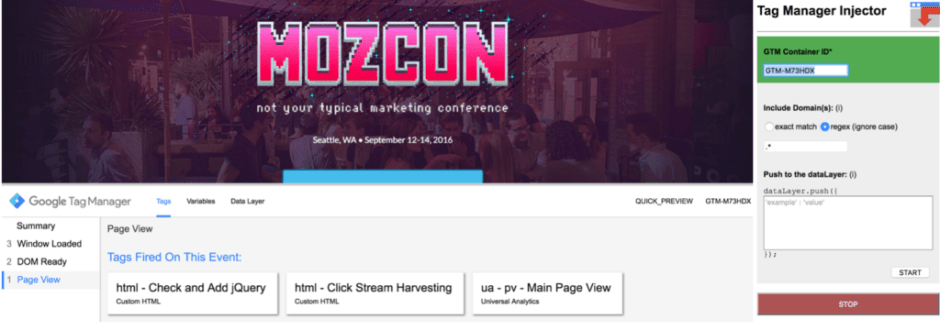
At UpBuild SEO Agency, we’ve configured entire implementations before the client was able to get the base container coded for GTM added to their site. Once the requisite code went live, all the complex tagging was already tested and ready to go. This is a great way to ensure that you’re not left with your hands in your pockets as you wait on development cycles.
Tip 5: Leverage Environments & Workspaces
If your company or client has a multi-tiered development workflow, you can take the idea of QA and testing to the enterprise level with GTM Environments. Say the site you’re working on has “development”, “staging”, and “production” servers.
Without getting too far into the nitty-gritty, what you’re able to do is define each environment that your dev team uses, install a unique GTM container tag on each, and then selectively push whatever container you’re working on to the appropriate dev environment for Testing and QA. This is great because it will allow multiple parties to test things out simultaneously.
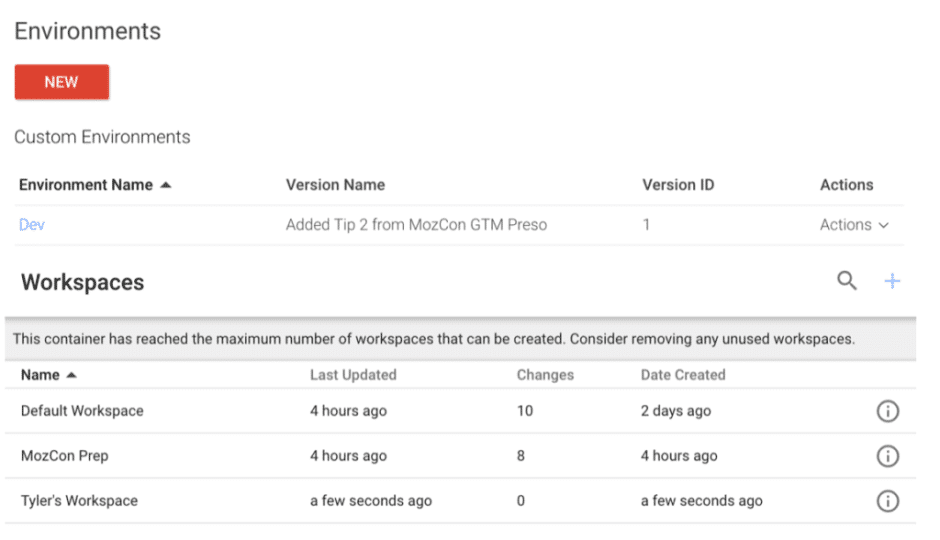
And speaking of collaborations, WorkSpaces are an awesome new feature that was rolled out less than two weeks ago. Now, you can have multiple marketers working out of the same Google Tag Manager account without fear of overwriting each other or breaking each other’s tagging.
As you go in to start making changes in your account, you’ll automatically create a new WorkSpace that will hold all of your changes until you’re ready to push them out as a new container version. If someone else has to then hop in and make an immediate change (say you’re out sick for a day in the middle of building out some tagging), and they publish their changes, they’ll have done that in their own separate workspace, and GTM will notify you that the live container has been updated and walk you through how to reconcile those changes with your work in progress. It’s amazingly helpful and is a huge step forward in Google getting into the enterprise tag management game.
Tip 6: Make (Semi-)Permanent Changes
We’ve been talking a lot of CRO throughout MozCon and, as we know, it’s super important to be able to hypothesize, experiment, implement, and then keep testing. But what if your organization just doesn’t have the ability or bandwidth to set your winning variation in stone? Simple. Hack it with GTM.
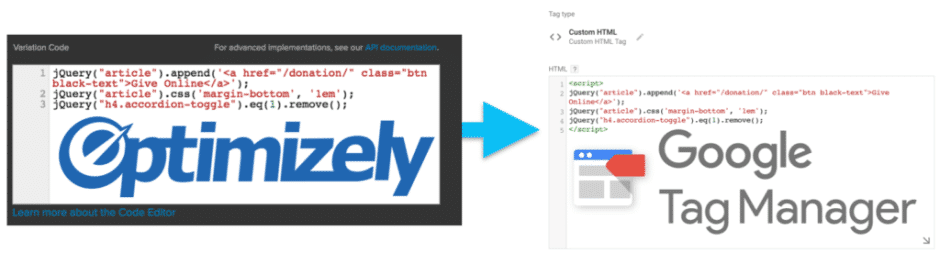
Tools like Optimizely generate Variation Code that you can get from the bottom of your Optimizely experiment editor. So if you know you have a winner, but you can’t get your version made permanent yet, just pull up that variation code, copy/paste it right into a Google Tag Manager html tag and you’re good to go. Note that this is likely going to be a better option than keeping your experiment running in Optimizely and just sending 100% of visitors to your winning variation. Why? Unless you’re on an Enterprise Plan with Optimizely, you’re paying based on the number of visitors in your tests. Don’t burn money; do it in GTM.

Tip 7: Track File Downloads
Analytics pros know that clicking to download a file isn’t tracked by Google Analytics out of the box. But if downloading these assets is considered a micro-conversion event for your organization, you need to get at that data! Tracking this in GTM is incredibly easy to set up.
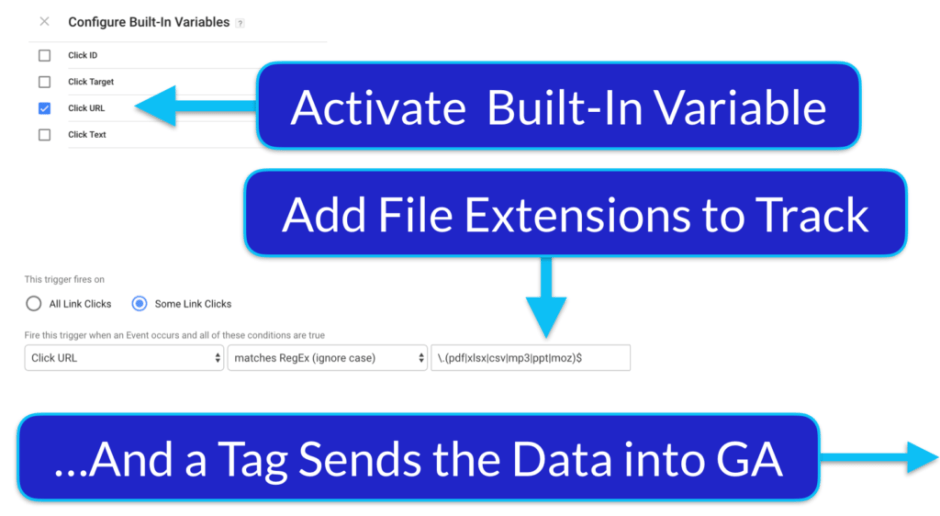
First you need to activate one of Google Tag Manager’s built-in variables: Click URL. This means that any time a user clicks on a link, GTM is going to be able to “hear” where that link goes to. To track file downloads, you just have to set up a GTM Trigger that tests that click URL against the file types you want to track. What you’re seeing in the screenshot is a RegEx that matches files like PDF, CSV, MP3, etc. When that trigger goes off, you then have a dedicated Analytics Tag that sends your data into Google Analytics. Boom. You can then use that to configure goal tracking in your analytics account.
Tip 8: Track (Offsite) File Downloads
But what if you’re sending customers or leads links to files in emails or posting those links on social media? You’ll never see that data in Google Analytics because that individual file isn’t going to include any GTM code, let alone Google Analytics tagging. What you need to do is architect a method of intercepting the user and logging that data before sending them on their way.
The one piece of the puzzle that you can’t create entirely in Google Tag Manager is a pseudo-download page. This page is only going to be seen for a split second, so it doesn’t have to be anything fancy: a simple “Please Wait While We Prepare Your Download” will suffice.
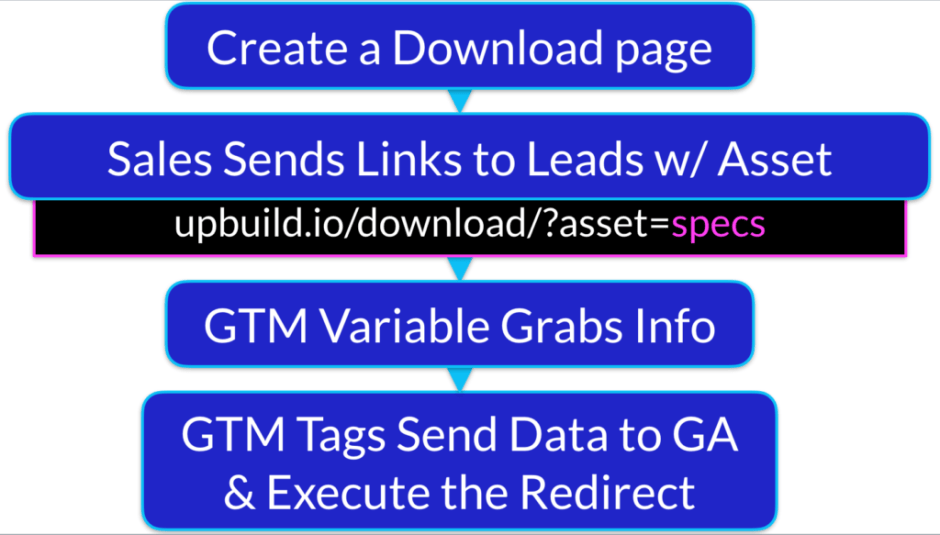
Using GTM, you’ll then set up two tags and a couple of variables: a Google Analytics tag, an HTML script tag, and variables that pull information out of the URL as in the example. Immediately on page load, those variables are going to grab the information that you’ve passed in (like which asset the user has been sent to and any lead data about that user) and send it to Analytics via your GA tag. Then, the second HTML script tag will dynamically redirect the user to the appropriate downloadable asset.
Easy, right?
Tip 9: Track Outbound Clicks
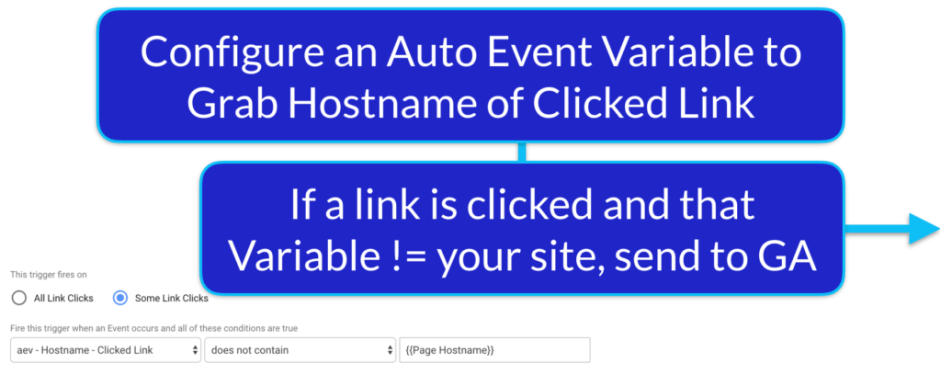
Tracking outbound clicks is similar to tracking onsite file downloads, but it does require more GTM gymnastics. Rather than just turning on a built-in variable, you’ll be creating what’s known as an Auto Event Variable that will grab the hostname of the clicked link. Auto Event Variables allow you to access data points about an interaction as it happens, so as someone is clicking a link, we want to be able to grab the hostname of the link that was just clicked, because (and this is the straightforward part) if the hostname isn’t the hostname of our website, we want to track that as an outbound click.
But as with everything, be mindful of how you’re collecting that data and how you ultimately want to see it. I’ve seen implementations where every single outbound link was tracked by printing the entire link URL into Google Analytics. What actionable information is that going to give anyone? No one needs to see every single link here; what you want is to pinpoint the larger trends, like which domains your users are finding most attractive. So don’t send the full URL of the outbound link into Google Analytics; send just the hostname and you’ll get an SEO report of how many people clicked on links to Moz, to Wikipedia, to Google, etc.
Tip 10: Configure Cross-Domain & Subdomain Tracking
If you’re seeing your own domain show up in your Google Analytics reports, you probably have a problem with subdomain tracking. There’s a common misconception that subdomain tracking is synonymous with cross-domain tracking and people use the terminology interchangeably. It’ll drive you crazy.
Of course, subdomain tracking is for when you want to be able to track users navigating between different subdomains on your website.
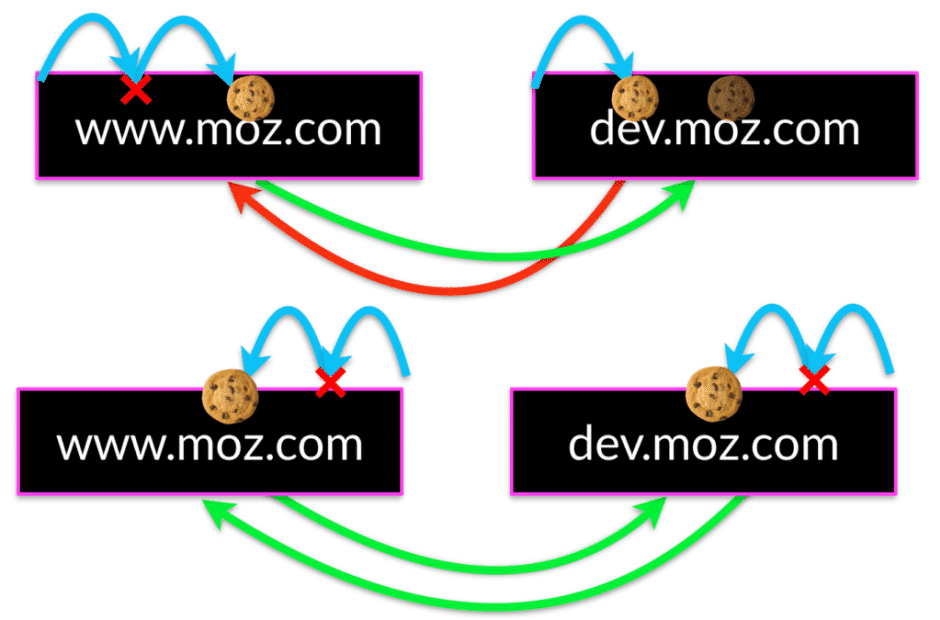
In this example, Moz would likely be seeing moz.com in their referring domains report. That’s because by default, Google Tag Manager isn’t going to set the Google Analytics cookie properly. The default behavior is going to try to set the GA cookie in the first place that it can. For the main site, “www” isn’t actually a real subdomain, so the cookie is set on the domain “moz”. On the developer site (which doesn’t actually exist here, BTW), GTM is going to try to apply the cookie to “dev” first, which IS a valid subdomain, so there it stays. When a user goes from the dev site to the main site, the cookie is set to tell GA that they’ve already visited dev.moz but not just moz. If they take that road the other way and come from the moz domain first, it works because dev.moz has an implied or ghost cookie on the domain.
What we need to do is set “CookieDomain” to “auto” in GTM, which flips things into reverse. On both sites, GTM will try to set the cookie on .com, which doesn’t work because that’s just a domain extension; then the next element it gets to is moz, which checks out so the cookie for both sites is set in the same place and everything is sunshine and rainbows.
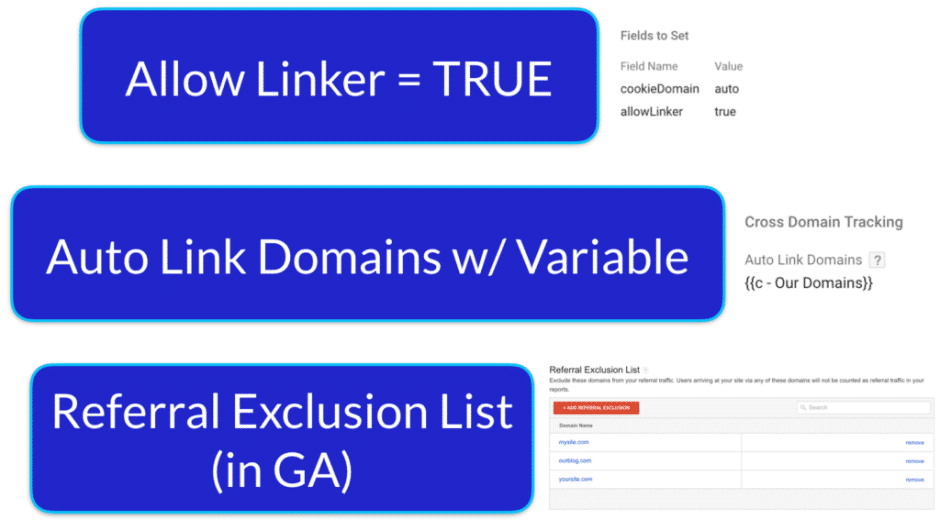
Cross-domain tracking is when, you guessed it, you want to track users navigating between completely different domains. You only really want cross-domain tracking when you have two or more domains that are part of a single user journey. So if you have to send users to a third party site to check out, or if you have a family of websites that users will naturally pass back and forth between, use this. In GTM it’s a simple matter of editing your analytics page view tags to “allowLinker” and then heading to the Cross-Domain Tracking subsection of that same tag and adding a comma-separated list of your domains. And here’s a part that’s easy to forget: you must hop into Google Analytics (not GTM) and add all of those domains to your Referral Exclusion List. Otherwise, this is all for naught.
Further Reading: Cross-Domain and Roll-up Reporting by Asmaa Mourad
Tip 11: See Full Hostnames
Speaking of subdomains, you’re also going to want to see those full domains printed in your GA reports. There are other ways to do this with filters within the GA interface, but I prefer doing it in Google Tag Manager (surprise, surprise).

All you have to do is turn on two more of GTM’s built-in variables: the Hostname and the Page Path. Then you hop back into your Google Analytics page view tag in Google Tag Manager and choose “page” as a field to set. What this does is allow you to overwrite the page path that’s sent into GA so that you’re not only seeing the path (everything that comes after .com), but the hostname that comes before that as well.
Tip 12: Strip Out PII
Let’s talk about PII: Personally Identifiable Information. This is a legally sensitive topic so let me just remind everyone that I’m not a lawyer and nothing I say here should be construed as legal advice. If you read through Google’s Terms of Service (ToS) for GA, you’ll see that sending any kind of PII to Google’s servers is…not cool. What’s the worst that can happen? Your entire Google Analytics profile can be wiped. Not just a the specific GA view that had the violation; your whole analytics profile.
And here’s the super-fun part: even if you’re using GA filters to “remove” PII from your reports, remember that those filters only go into effect after Google’s received your data. Even with filters, you could be sending PII to Google’s servers and technically be committing a violation.
The only way to stay safe is to never send PII to Google’s servers in the first place. Of course, you should make sure that everyone in your organization understands the risks and potential fallout associated with sending PII to GA, but you can also take steps to protect your data. How? Use GTM to intercept, remove, and then flag PII before anything gets sent over.
In most cases, PII gets accidentally sent over query string parameters. Accordingly, we can set up GTM to so that it cleans ALL query string parameters by default before you send any of that data. The basic flow works like this.
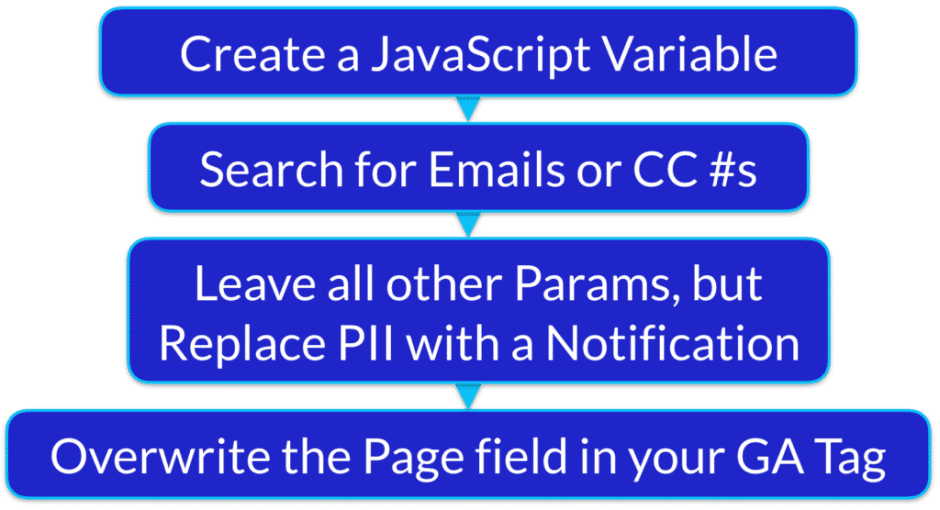
What we’ll actually be doing is using a custom JavaScript Variable in GTM (which is, at its core, a JavaScript function that’s going to return a single data point that you can use within your tags). This function is going to receive the query string, search for the dead giveaways that indicate PII (strings of 13 to 16 numbers and/or text strings that contain the @ sign) and replace those values with a warning message (CCRemoved or EmailRemoved) while leaving any non-offending parameters intact.
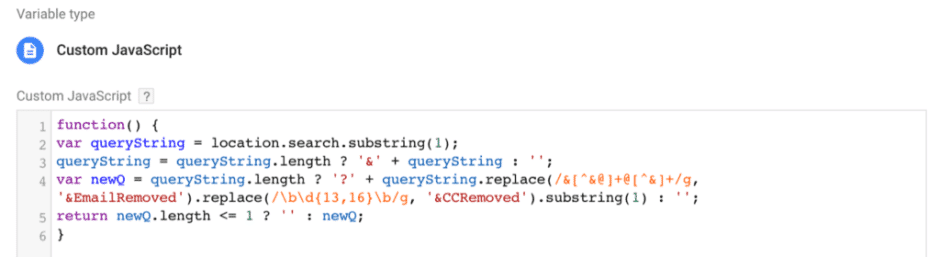
If you don’t have PII, this variable is going to output the same QSP that you sent in. If it does find PII, this GTM variable is going to strip out the PII and replace it with the warning message. Then it’s up to you to put on your detective hat and figure out why you’re being sent PII in the first place.
Further Reading: Google’s Best Practices for PII & Avoiding PII in Google Analytics on Analytics Demystified
Tip 13: Use Nested Variables
This is a nice quick tip, and you actually might have noticed our examples have used this a lot. GTM gives you the ability to use variables within variables. You can even use variables within your custom JavaScript tags!

I became dissatisfied with the original example I’d planned to use because I found a much cooler example published on YouMoz just last week. The post by Lucía Marín talks you through how you can create a canonical URL variable in GTM that’s made up of three other variables {{Page Protocol}}://{{Page Hostname Canonical}}{{Page Path}}. It’s a great idea, a great read, and as people on the UpBuild team are fond of saying, “very UpBuildy”.
In any case, this just serves as a beautiful illustration of the massive flexibility that you have with Google Tag Manager to pull things apart and put them back together in ways that suit your needs.
Tip 14: Merge GA & CRM Data
Anyone who’s worked in B2B or lead gen knows how important it is to pay attention to both your Analytics and CRM data, but did you know that you’re able to merge these two data sets so that you can see all of it in one place? With Google Tag Manager, it’s surprisingly easy.
Every CRM platform is going to assign a unique user ID to a lead and store that in a browser cookie. This is what allows a CRM platform to attribute multiple sessions, form submissions, and other touch points to the same user. This unique User ID is also commonly used to grant users free access to previously gated content following their initial registration.
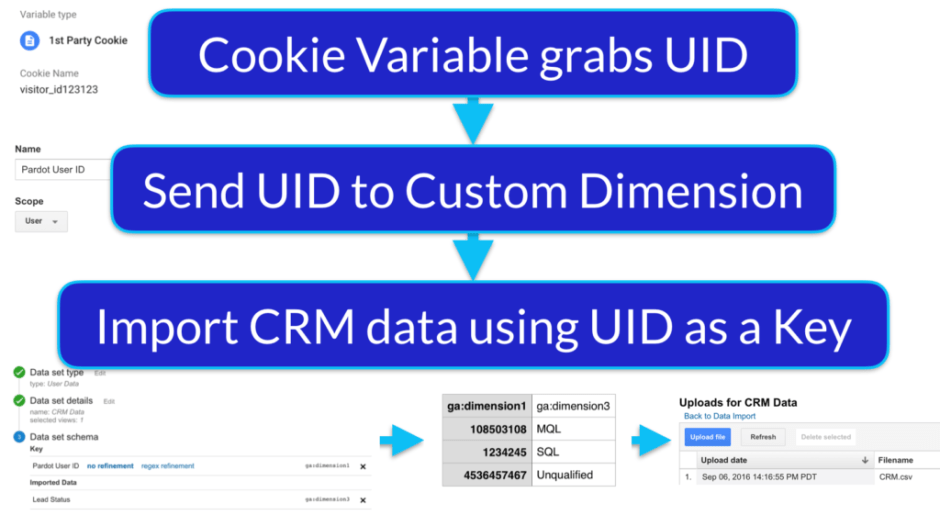
With Google Tag Manager, you can grab that same unique User ID and pass it into your Google Analytics as a Custom Dimension. This means that you’re logging that same ID in both platforms so that, later down the line, you can merge these two data sets using a unique key.
The only digging you’ll need to do is to find out the name of the cookie that your CRM platform sets for the User ID. Once you know that name, you can use Google Tag Manager’s built-in 1st Party Cookie variable type to grab that user ID. You then create a “User ID” Custom Dimension within Google Analytics, and update your Google Analytics page view tag in GTM to populate that value whenever that data point is available (meaning, whenever a given user is recognized by the CRM).
From that point forward, you’ll have that ID in your GA and CRM data sets. Then, at regular intervals, all you have to do is export your lead data from your CRM with the UID and use the Universal Analytics data import feature to merge that data with your GA data. It’s that easy, but definitely take some time to read up on it.
Tip 15: Leverage a Data Layer
I mentioned the Data Layer way back in Tip 3 and promised we’d get back to it. Well, here it is! I personally enjoy reading the many philosophical debates about how, why, and when to use a Data Layer or how one even fits into what we do in web technology, but i’ll do my best to keep it simple and focused on its usage in GTM.
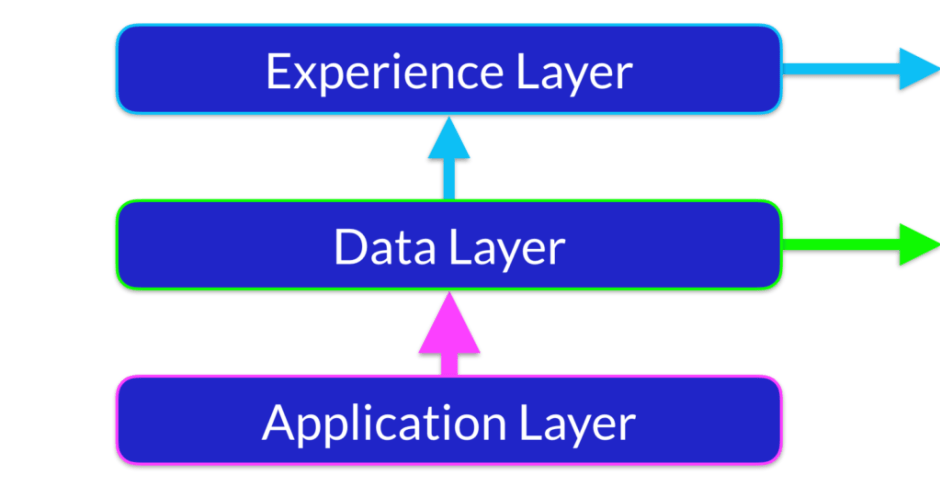
For the majority of websites that we work with, we have an Experience Layer that consists of everything our users can see and interact with. It’s the pretty, clickable stuff that converts and it’s also where we place a lot of our analytics tracking. In fact, Tip 3 on click data harvesting is exclusively tracking applied to the Experience Layer.
The Application Layer is made up of our functionality, our database, etc., and it’s what makes the Experience work.
The Data Layer (or dataLayer, as it’s written in GTM) provides us with an opportunity to surface information from our Application Layer that doesn’t necessarily ever need to become a part of the Experience, but that we still might like to be able to use in analytics.
Take, for example, a blog post’s category, a publishedDate, or a user’s logged-in state. Within the Data Layer, you could store the user’s logged-in state and then set that as a Custom Dimension in Google Analytics so that you can segment out your known users and create reports focused on “prospects” only.
Tip 16: Measure Scroll Depth
We know by now that creating content for the sake of content is a waste of time. Your content has to be engaging and actually match searcher intent. Never forget that except in very rare cases, you’re not the target audience. You don’t know what’s going to work unless you measure, so Tips 16, 17, and 18 are going to give you new ways to measure engagement.
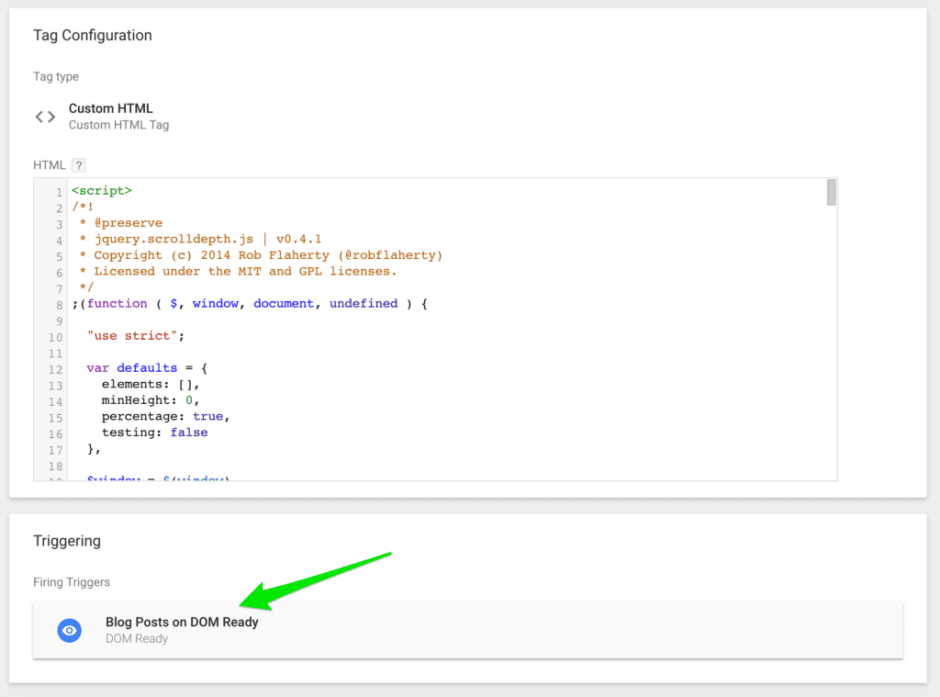
So, how far down your massive marketing landing page are people getting? Are people actually reading that 12,000-word blog post? It’s easy to find out, thanks to Rob over at Parsnip.io. His awesome Scroll Depth plugin is free to use and easy to install. Out of the box, you’ll be able to see how far users get down your pages at 25% increments, or you can customize the increments to suit your needs.
Further Reading: Scroll Depth Plugin on Parsnip
Tip 17: Observe Dwell Time & Measure Stickiness
Along similar lines — and I think this is potentially more meaningful than scroll depth — you can measure page dwell time, that is, how long users actually spend on your pages. It’s easy to get hung up on bounce rate, but remember that to GA, bounce rate is just the rate of single page visits. Even if a user spends 15 minutes getting everything they needed out of a great blog post you wrote, GA will record a bounce if they leave the site directly afterward. But that was a good-quality session.
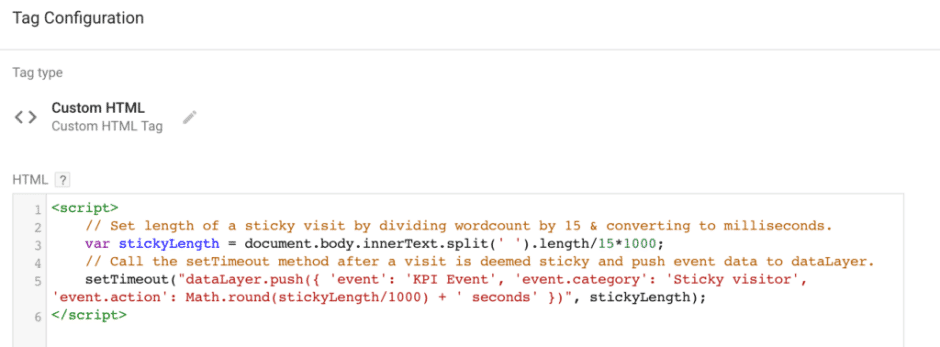
Combat that by measuring Dwell Time using an HTML tag in GTM that deploys the setTimeout method to push an interaction into the dataLayer after a predetermined amount of time. You can set that timeframe to be whatever you want. If you always want it to be 10 seconds, great, but I prefer to get dynamic with it. Using more JavaScript, we can actually count the number of words on the page, divide that by 10, and then multiple by 1000 to get milestones. Adjust that number to get to a range you feel good about, but with this one, if we had a 1,400-word post, we’d say that visitor was sticky after about 90 seconds.
Also, remember how time is defined in Google Analytics: it’s the time between two hits. If you spend 30 minutes reading a single page and then leave the site, that shows as a 0-second visit. This will show you TRUE time on site.
Tip 18: Monitor Pogosticking
Now this one is the most advanced of the three and something I’d classify as highly experimental. What we want to do here is measure how long users are spending on an organic landing page before bouncing back to the SERPs. If someone clicks into your site from Google’s results, takes four seconds to realize your site isn’t all they hoped it’d be, and bails back to the SERPs, you need to know that. You’re trying to earn the long click because at the end of the day, who freaking cares that you rank on the first page if no one who comes to your site stays there? It’s also a safe bet that you won’t rank that well for much longer if that’s the kind of engagement you’re able to offer.
So how can we measure this? Let me preface this by stating that this idea is 100% from Simo Ahava, a pioneer in tag management. When a user lands on the site via a SERP, we log a browser history entry using a hash. This is important because we’ll be watching to see if a hash change occurs. If it does (and the hash string is blank) this means the user is hitting the back button, so we fire a Google Analytics timing event using GTM, and then invoke the “Back” event in their browser history.
Use this at your own risk; it’s a total hack and there are plenty of ways it could go wrong. I mean, we’re forcing made-up events into browser history and intercepting the back command. Depending on how your website is built, this may or may not work, so my recommendation is to test thoroughly to make sure it’s all behaving as expected. If your JavaScript skills are lacking and you have developer resources, think about getting some help from them.
Further Reading: Simo Ahava’s Awesome Original Hack
Tip 19: Include Outsiders Only
Let’s get back to some simple stuff: filtering out your own website’s traffic. The traditional way to do this is by filtering out specific IPs or IP ranges with Google Analytics’ filter settings, but what if you don’t have offices with static IPs? What if your team is remote?
Google Tag Manager to the rescue once again! Designate a query string parameter for your team to opt in to for filtering and distribute it around your organization; have them open that link on every device that they work from and re-up every 6 months.
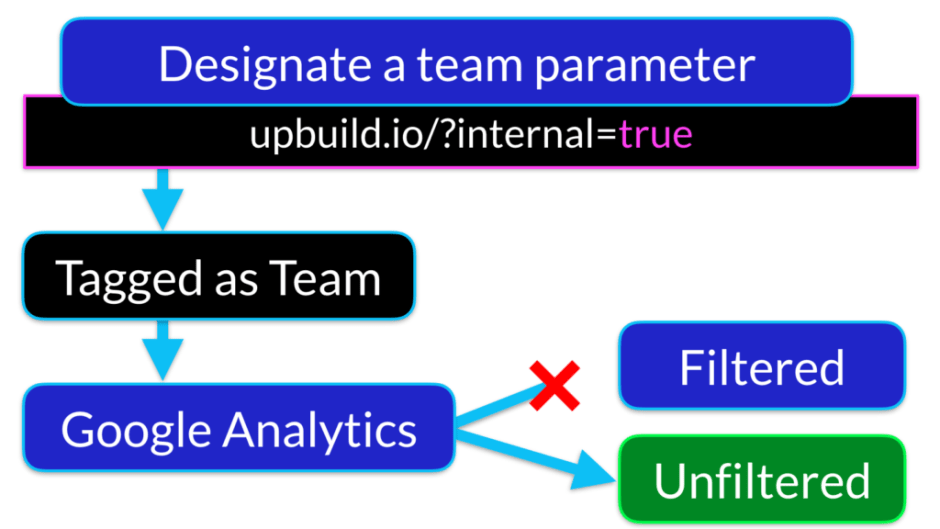
Use Google Tag Manager to create a new URL variable that grabs the query component and tell it to look for the specific parameter that you defined: “internal”. Then, modify your Google Analytics page view tags to set that value as a Custom Dimension. If you’ve configured that Custom Dimension to be user-scoped, anyone who visits your site via that URL will be tagged as internal traffic from that point forward, and then it’s just a simple matter of applying a filter to your GA data that excludes users for which “team traffic” equals “true”.
Remember: anytime you’re applying filters, maintain an unfiltered view so you always have an unadulterated backup.
Tip 20: Update Metadata
Have you ever had those moments when you knew that updating something as simple as metadata just needed to be done, but you didn’t have CMS access, or, worse yet, your client was using a homegrown website that couldn’t be easily updated? Well, using Google Tag Manager, you can get around all that and update your page titles, meta descriptions, canonical tags, and more using JavaScript. This is made possible by Google’s recent advancements in rendering client-side scripting, but keep in mind that there’s a big ”if” here. You can use GTM to update your metadata, IF your site doesn’t have a lot of other JavaScript complexity going on. Google’s only going to deal with so much JavaScript before it moves on, so it’s the simpler websites that can get away with this.

Even though I started experimenting with this months ago, it still blows my mind. This isn’t the WordPress page title for that page. The real title is just “Analytics”, but we set GTM to change it after the page loads. Sure enough, Google indexed the modified version about two weeks after I pushed that tag live!
Go ahead and play with this! Maybe we can push it until we find out how much JavaScript is too much JavaScript for Google.
Tip 21: Implement Structured Data
Speaking of the SEO applications of Google Tag Manager, let’s talk about GTM for semantic markup! Something I spoke about at SearchFest earlier this year was using Google Tag Manager to dynamically insert JSON-LD Structured Data into your site. At that point, it was fairly speculative, but thanks to a great Moz post by Chris Goddard, who is a far better coder than I’d ever hope to be, he figured out the missing secret sauce. I had the honor of providing some feedback on that post, and now, using this new method, we’ve been able to scale JSON-LD across entire sites using…wait for it…one HTML tag in Google Tag Manager and a whole boat load of variables. Take this recipe site that I recently had the pleasure of working on. With thousands of recipes and new ones added every week, they want to position themselves to take advanced of Google’s new recipe Rich Cards.
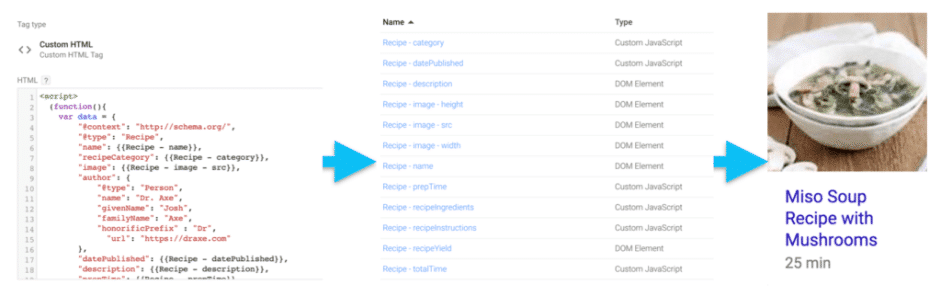
Well, starting is simple: grab the recommended JSON-LD from Google’s Help Center and create a basic JSON-LD template in an HTML tag. Then, go about identifying where and how you can pull in relevant data points using GTM variables: things like the recipe title, prep time, ingredients, pictures, etc. Then you configure that same tag to fire on every recipe page and those variables pull in the right info for each recipe page automatically. This validates perfectly in the structured data testing tool, gets picked up in Google Search Console, and, most importantly, actually yields Rich Cards in the wild. [Note that these folks need to implement rating functionality before they can get those stars in their cards.]
Further Reading: Chris Goddard’s Super Helpful Walkthrough on Moz
Tip 22: Hack Site Search Tracking
Being able to see what users are searching for on your site is incredibly valuable. It tells you where your content and your information architecture may be falling short, and shows you when you either need to make some content more discoverable or create new content to meet the demand.
The challenge is that “normal” internal search tracking requires functionality that adds query string parameters to the URL for your internal search results, but what if your site search puts the search terms string into the URL, and not as a query string parameter? You’re not out of luck, but Google’s official recommendation isn’t that helpful; it’s essentially: configure your application or hack the GA tracking code. Hack the tracking, you say? Cool, let’s use GTM.
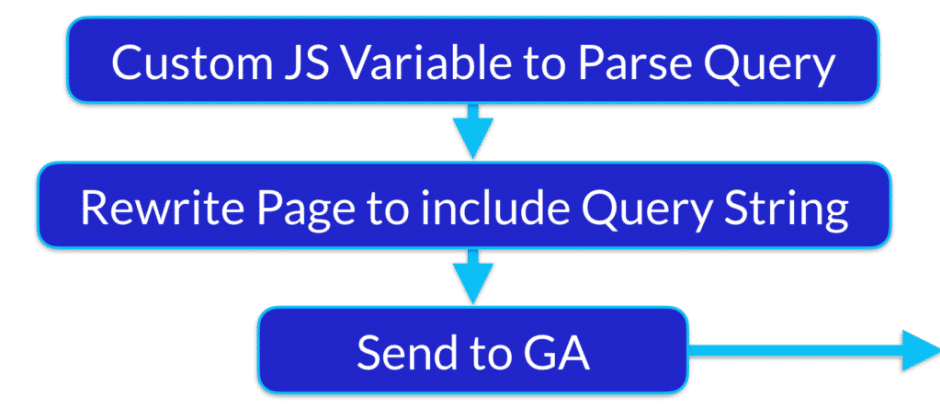
We can create a custom JavaScript variable to pull apart the internal SERP URL and return whatever the search term is. Then on those internal SERP pages, you (we did this before) overwrite the page path to include those query strings.
Tip 23: Configure Analytics for Web Apps
So how do you track ANYTHING at all when you’re working with a dynamic web app (like something built with Angular) where URLs don’t change as you navigate through? I wish I had a one-size-fits-all solution for you, but I don’t and I don’t know if anyone does. I’ve hacked together solutions in GTM where I was running checks every time a page element was changed by the app, just waiting for this conversion element to show up, so that if and when it was found I could attach a click or form submit handler to it.
And sometimes if you’re lucky, you’ll work with developers kind enough to have configured dataLayer.pushes at predefined points or following user interactions, so you can grab that info and push it into GA. But you kind of need to play it by ear and experiment until you find something that works. Build. Ship. Learn. Decide.
But, if you are on Angular, check this out. I haven’t had the chance to dig into but it looks very promising.
Further Reading: Angulartics on GitHub
Tip 24: Measure Video Engagement
Remember video? It’s still an important part of our marketing toolkit! Just like with any other form of content on the web, you can’t just create video for the sake of video and call it a day.
How are users reacting to that? Do people who watch videos convert more readily than those who don’t? If you’re using embedded YouTube videos, there’s a great Script from Cardinal Path that you can use with GTM to harness the power of the YouTube API to track video engagement. It’ll track it in 25% increments by default but you can customize it if you need to. Be careful though. In my past agency life, I worked on analytics for Dollar Shave Club and we couldn’t talk them out of measuring video progress in 10% increments. Unfortunately, this led to extremely frequent YouTube API requests (especially when you’re recording 10% increments on a minute-and-a-half-long video) and pretty quickly, we were requesting data faster than we could get it back. We had so many lost data points that the whole data set was ultimately worthless and couldn’t be used to generate any accurate insights.
So, bottom line: your capacity to collect video engagement data from YouTube videos does exist, but do yourself a favor and just use Wistia like a grownup. I’m not being paid to say that, but their Google Analytics integration is off the chain.
Further Reading: YouTube Video Tracking with GTM V2
Best Resource: Wistia (worth every penny)
Tip 25: Monitor Form Abandonment
On Day 1 of MozCon, Cara Harshman recommended looking at form submission error reports in Google Analytics to ideate tests. Well, how can you get that data when it’s not in Google Analytics out of the box? There are plenty of ways to do it, but let’s go all-out and collect data about how far users get into a form before abandoning it.
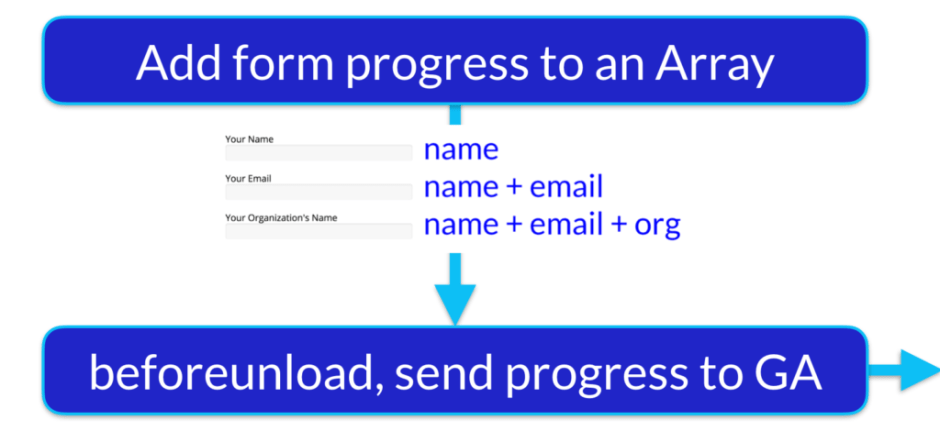
As users interact with each successive field in a given form, you essentially keep adding values to an Array variable in JavaScript to record their progress. If users leave the page, you convert that JavaScript Array into a readable text string and send it to Google Analytics. If they only make it to the first field, your report is just going to read “name”; If they get to the third field, it’s going to read “name > email > org”.
Note: Remember the thing about PII? Don’t grab the actual email! Grab the name of the form field itself.
Tip 26: Measure AdBlocking Traffic
If you’re an ad-supported site, understanding the impact of Ad Blockers on your bottom line has never been more important. To get an approximation of how many users are using Ad Blockers on your site, you can set up a decoy ad script and see if it ends up getting blocked.
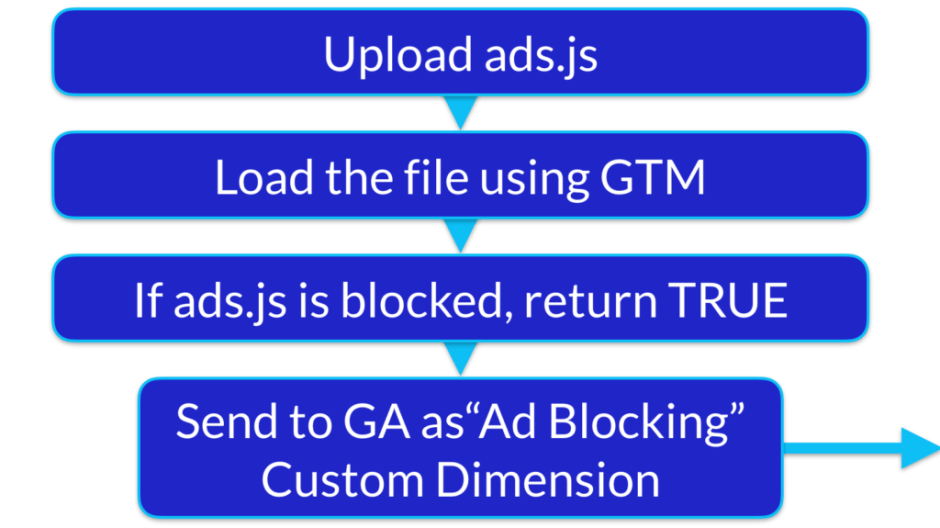
However, keep in mind that some ad blockers don’t just block ads from Google; they block any request to Google servers. That means no GMT and no Google Analytics. The only places those visitors are going to show are your log files.
Further Reading: Measure Ad Blocker Impact by Simo
Tip 27: Close with Personalization
Close the Sale and Seal the Deal with Personalization. Like so many of the tips presented in my talk, this is the getting-your-hands-dirty underdog-with-no-budget approach. You can find great website personalization solutions (likely paid) that will allow you to do this with greater ease, but for a proof of concept this can be great.
What we’re trying to do here is identify users who entered our conversion funnel and didn’t convert on that first pass, but who might be open to persuasion.
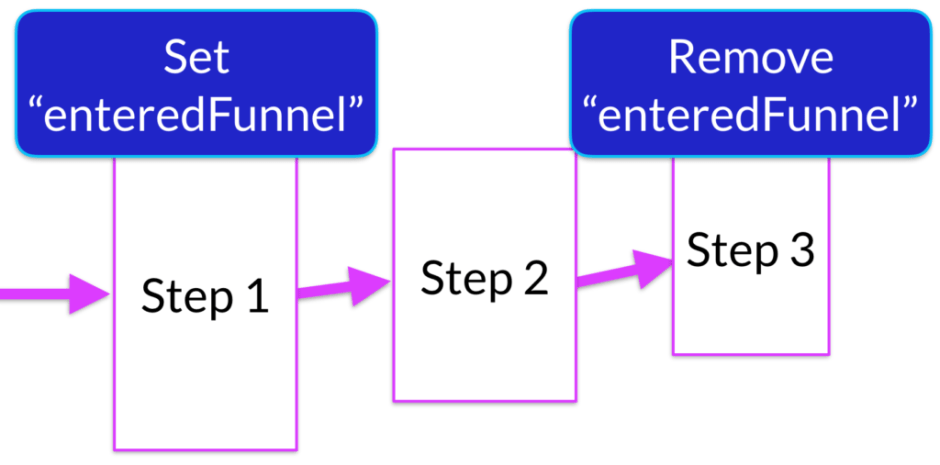
Using Google Tag Manager, you can set up a Trigger to set a cookie called “enteredFunnel” on the first page of your conversion funnel. Set up a second tag on the completion step of your funnel to remove that cookie. Who still has that cookie at the end of the day? The folks who didn’t convert.
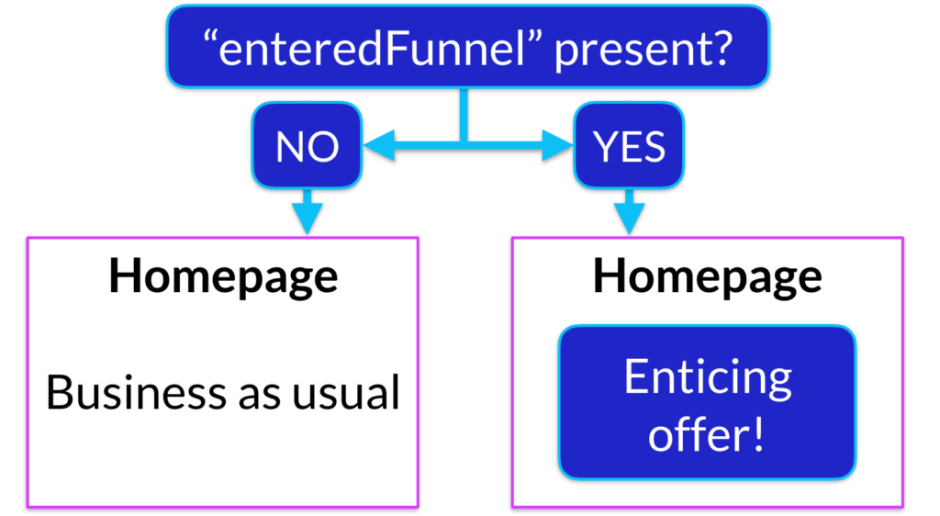
So on something like your homepage, you use an HTML GTM tag to change up the page copy, the messaging, or something more elaborate to really drive the point home to users who have that cookie. You can be a little more aggressive than you’d like be for your everyday users because you know these people have already taken the first step.
Tip 28: Create Flexible Lookup Tables
I keep saying there’s no standard way to use Google Tag Manager, but this is just a straight-up awesome way to use it. Props to Stephen Harris at SEER for coming up with this guide to building massive and flexible lookup tables for GTM. It uses a mix of Google Sheets with Google Tag Manager’s Import functionality so that you can carefully create huge lookup tables without fear of having things crash on you (and also support using RegEx in your lookups).
What are lookup tables, you ask? They’re essentially fancy variables where you pass in one data point and then return a corresponding data point based on that input. For example, you could have a huge lookup table to map domains to their respective UA-IDs. However, if you have a lot of complexity and things aren’t always one-to-one, these things could get pretty huge. Using Stephen’s method, you make that way more efficient and streamlined.
Further Reading: GTM Match Table Generator on Seer
Tip 29: Import & Export Containers
As mentioned in passing above, Google Tag Manager offers incredibly useful Export/Import functionality. What you’re able to do is Export fully-formed GTM containers (the full collection of all tags, triggers, and variables in your container version) and Import that file (it’s a JSON file, FYI) into another GTM container.
What that means is that you can save yourself days’ or weeks’ worth of work by reusing tags, triggers, and variables that you’ve already put in your time developing. At UpBuild SEO Agency, we maintain a centralized GTM container that forms the foundation of any new GTM setup. When we have to start setting up tracking for a new site, we can just import this GTM container, and instantly we’ve jumped ahead by hours if not days.
In order to give MozCon attendees a solid start with advanced GTM usage, we’re making that container available. You can download this container for free and Import it into your own GTM container so that you have all of the tags, triggers, and variables from the 29 tips above ready to roll.
The name of this GTM Container is Eru II and it’s the second major iteration for us. Fun Fact: it’s named after Eru, the creator of all things in Tolkien’s Lord of the Rings mythology. What did you expect it to be called?
Please contact us to get started for free.
We plan to make future iterations of Eru public, so if you’re interested in receiving emails when we release new updates or write new blog posts about advanced GTM, you can sign up below.
Conclusion
GTM can feel like a rabbit hole. The deeper you go, the more powerful it becomes. But here’s the truth: you don’t need to master everything at once.
Pick one small thing. Maybe it’s cleaning up your tags. Maybe it’s testing that trigger you’ve been avoiding. Try it. Break it. Fix it. Practice is the best way to learn GTM.
And once you’ve figured something out, share it. Write a quick blog post. Or better yet, pitch a guest post to a site you admire. That’s how you grow!
Now go build something cool.


